入门指南
欢迎来到异步Rust的世界!如果你正准备编写异步的Rust代码,就来对地方了。无论是搭建一个web服务器、数据库还是操作系统,本书都会向你展示如何运用Rust的异步编程工具,来最大限度地利用硬件。
本书所覆盖的内容
本书意在作为一个易于理解的最新指南,来讲解异步Rust语言特性和库的使用。无论是初学者还是老手都很适合阅读本书。
-
前面的章节会先从总体上介绍异步编程的概念,再从Rust的角度入手讨论。
-
中间的章节讨论了可在编写异步代码时使用的实用程序和控制流工具,还讲述了关于在构造库和应用时,能够最大化性能和可重用性的实践方法。
-
最后一节更广泛地讨论了Rust的异步生态,并提供了一系列的例子来展示,如何完成一些较为平常的任务。
扫清障碍后,就让我们来探索Rust异步编程的世界吧!
为什么需要异步?
Rust写出的程序又快又好,已经很受欢迎了,那为什么还要编写异步的代码呢?
异步代码让我们能够在同一操作系统的线程上并发地运行多个任务。一个有代表性的例子就是,如果要同时下载两个网页,就得把工作分配给两个不同的线程,就像下面这样:
fn get_two_sites() {
    // Spawn two threads to do work.
    let thread_one = thread::spawn(|| download("https://www.foo.com"));
    let thread_two = thread::spawn(|| download("https://www.bar.com"));

    // Wait for both threads to complete.
    thread_one.join().expect("thread one panicked");
    thread_two.join().expect("thread two panicked");
}
确实这么做在很多应用场景下都行得通——毕竟这就是线程的设计目的:一次运行多个不同任务。然而局限性也同样存在:在不同的线程间切换或共享数据会带来很大的开销,即便一个线程不做任何事,也会消耗大量宝贵的系统资源。因而要通过异步的代码设计来消除开销。我们可以通过Rust的async/.await关键字来重写上面的函数,以在不创建多个线程的条件下同时运行多个任务:
async fn get_two_sites_async() {
    // Create two different "futures" which, when run to completion,
    // will asynchronously download the webpages.
    let future_one = download_async("https://www.foo.com");
    let future_two = download_async("https://www.bar.com");

    // Run both futures to completion at the same time.
    join!(future_one, future_two);
}
总的来说,与相应的线程实现相比,异步应用程序可能更快,开销更小,但并不是没有任何开销:线程是受操作系统原生支持的,使用线程不需要特殊的编程模型——任何函数都可以创建一个线程,而调用这些函数就跟调用普通的函数一样。而异步的函数则需要编程语言或库的额外支持。
在Rust中,async fn能够创建一个返回Future的异步函数。为了执行其函数体,必须运行返回的Future来完成任务。
别忘了传统的多线程应用也可以非常高效,而由于Rust的低内存占用和可预测性,即便不使用async也可以做很多事。由于异步编程模型而增加的复杂性不一定值得,因此考虑单纯地用多线程是不是更好,也很重要。
异步Rust的现状
随着时间的推移,异步Rust生态系统经历了许多演变,因此很难搞清楚该用什么工具、库或文档。而标准库中的Futuretrait和async/await最近才进入稳定版本,因此整个生态系统正处于向新稳定的API迁移的过程中,在此之后,点流失将显著减少。
就现在来看,Rust异步编程的生态仍处于高速发展的阶段,而其体验还需进一步的打磨。许多库还在使用futurescrate的0.1版本,也就是说为了实现互操作(interoperate),开发者得从0.3版本的futurescrate中使用compat。async/await的语言特性还处于新生阶段,像async fn这样的重要语法扩展也尚未实现,而现阶段编译器的错误也很难解析。
也就是说,Rust尚在探索为其异步编程提供最具性能和易于编写的方式,如果没有因此心生畏惧,就请尽情享受在Rust中深入研究异步编程的世界吧!
async/.await 入门
async/.await是Rust中用来像同步代码一样编写异步代码的工具。async会将一个代码块转换为一个实现了Futuretrait的状态机。尽管在同步方法中调用阻塞函数(blocking function)会使整个线程阻塞,被阻塞的Future会让出线程的控制权,好让其他的Future能够运行。
先在Cargo.toml文件中添加一些依赖:
[dependencies]
futures = "0.3"
使用async fn的语法就可以创建一个异步函数了:
#![allow(unused)]
fn main() {
async fn do_something() { /* ... */ }
}
async fn返回值是一个Future,一个Future必须通过executor来运行。
// `block_on` blocks the current thread until the provided future has run to
// completion. Other executors provide more complex behavior, like scheduling
// multiple futures onto the same thread.
use futures::executor::block_on;

async fn hello_world() {
    println!("hello, world!");
}

fn main() {
    let future = hello_world(); // Nothing is printed
    block_on(future); // `future` is run and "hello, world!" is printed
}
在一个async fn中,可以使用.await来等待另一个实现了Futuretrait的类型的完成,比如另一个async fn的输出。与block_on不同,.await不会阻塞当前的线程,而是异步地等待该future的完成,使得当这个future没有进展时其他任务仍然可以运行。
举个例子,假设有三个async fn:learn_song,sing_song,和dance:
async fn learn_song() -> Song { /* ... */ }
async fn sing_song(song: Song) { /* ... */ }
async fn dance() { /* ... */ }
一种方式是令learn,sing和dance分别被阻塞:
fn main() {
    let song = block_on(learn_song());
    block_on(sing_song(song));
    block_on(dance());
}
但这远非最好的方式——因为一次只能做一件事!显然要想sing,我们就必须先learn song,而dance是可以与learn和sing同时进行的。要这样做的话,可以创建两个可并行运行的async fn:
async fn learn_and_sing() {
    // Wait until the song has been learned before singing it.
    // We use `.await` here rather than `block_on` to prevent blocking the
    // thread, which makes it possible to `dance` at the same time.
    let song = learn_song().await;
    sing_song(song).await;
}

async fn async_main() {
    let f1 = learn_and_sing();
    let f2 = dance();

    // `join!` is like `.await` but can wait for multiple futures concurrently.
    // If we're temporarily blocked in the `learn_and_sing` future, the `dance`
    // future will take over the current thread. If `dance` becomes blocked,
    // `learn_and_sing` can take back over. If both futures are blocked, then
    // `async_main` is blocked and will yield to the executor.
    futures::join!(f1, f2);
}

fn main() {
    block_on(async_main());
}
在这个例子中,learn song一定会发生在sing song之前,但是learn和sing都可以和dance同时进行。如果我们在learn_and_sing中使用block_on(learn_song())而非learn_song().await,线程就不能在learn_song的同时做其他的事情了。(后者)使得我们可以同时进行dance。通过.await learn_song的future,我们让其他的任务可在learn_song被阻塞时接管当前线程,这样就能在同一线程上并发运行多个future直至其完成了。
现在你已经学习到了async/await的基础知识了,来个例子试试吧。
应用:简单的HTTP Server
来用async/await创建一个回显服务器吧!
首先,使用rustup update stable来确保你在使用Rust 1.39或者更新的版本。完成后,再输入cargo new async-await-echo来创建一个新项目,打开async-await-echo的文件夹。
在Cargo.toml中添加依赖:
[dependencies]
# Hyper is an asynchronous HTTP library. We'll use it to power our HTTP
# server and to make HTTP requests.
hyper = "0.13"
# To setup some sort of runtime needed by Hyper, we will use the Tokio runtime.
tokio = { version = "0.2", features = ["full"] }

# (only for testing)
anyhow = "1.0.31"
reqwest = { version = "0.10.4", features = ["blocking"] }
解决了依赖问题后,就写点代码吧。先添加必要的import:
use {
    hyper::{
        // Following functions are used by Hyper to handle a `Request`
        // and returning a `Response` in an asynchronous manner by using a Future
        service::{make_service_fn, service_fn},
        // Miscellaneous types from Hyper for working with HTTP.
        Body,
        Client,
        Request,
        Response,
        Server,
        Uri,
    },
    std::net::SocketAddr,
};
之后,再加入用于处理请求的模板:
async fn serve_req(_req: Request<Body>) -> Result<Response<Body>, hyper::Error> {
    // Always return successfully with a response containing a body with
    // a friendly greeting ;)
    Ok(Response::new(Body::from("hello, world!")))
}

async fn run_server(addr: SocketAddr) {
    println!("Listening on http://{}", addr);

    // Create a server bound on the provided address
    let serve_future = Server::bind(&addr)
        // Serve requests using our `async serve_req` function.
        // `serve` takes a type which implements the `MakeService` trait.
        // `make_service_fn` converts a closure into a type which
        // implements the `MakeService` trait. That closure must return a
        // type that implements the `Service` trait, and `service_fn`
        // converts a request-response function into a type that implements
        // the `Service` trait.
        .serve(make_service_fn(|_| async {
            Ok::<_, hyper::Error>(service_fn(serve_req))
        }));

    // Wait for the server to complete serving or exit with an error.
    // If an error occurred, print it to stderr.
    if let Err(e) = serve_future.await {
        eprintln!("server error: {}", e);
    }
}

#[tokio::main]
async fn main() {
  // Set the address to run our socket on.
  let addr = SocketAddr::from(([127, 0, 0, 1], 3000));

  // Call our `run_server` function, which returns a future.
  // As with every `async fn`, for `run_server` to do anything,
  // the returned future needs to be run using `await`;
  run_server(addr).await;
}
现在cargo run的话,终端里应该会显示 "Listening on http://127.0.0.1:3000" 的信息。若在浏览器中打开,就能看到其显示 "hello, world!"。恭喜!你刚刚写出了你的第一个异步的Rust webserver。
看一看请求的内容,就会发现它包含了请求的URI、HTTP版本号、请求头和其他的元数据一类的信息。可以这样直接输出请求的URI:
println!("Got request at {:?}", _req.uri());
可能你已经注意到了,在处理请求时我们并没有以异步的方式进行——我们只是立即进行响应,因此没能充分使用async fn的便利。比起仅仅返回一个静态的消息,来试试用Hyper的HTTP client来代理用户请求吧。
首先要解析请求的URL:
        let url_str = "http://www.rust-lang.org/en-US/";
        let url = url_str.parse::<Uri>().expect("failed to parse URL");
然后创建一个新的hyper::Client,用它来发起一个GET请求,并将响应返回给用户:
        let res = Client::new().get(url).await?;
        // Return the result of the request directly to the user
        println!("request finished-- returning response");
        Ok(res)
Client::get会返回一个hyper::client::ResponseFuture,其实现为Future<Output = Result<Response<Body>>>(在future 0.1阶段为Future<Item = Response<Body>, Error = Error>)。当对该future使用.await时,就发送了一个HTTP请求,且当前任务被挂起到队列中,直到有可用的响应。
现在再cargo run并在浏览器中打开http://127. 0.0.1:3000/foo,就会看到Rust的主页,终端中有如下输出:
Listening on http://127.0.0.1:3000
Got request at /foo
making request to http://www.rust-lang.org/en-US/
request finished-- returning response
庆贺吧!这样就成功地代理了一个HTTP请求。
底层探索:Future的执行和任务(Tasks)
在这一节中,我们将会涉及到Future和异步任务在底层的调度过程。如果你只是对如何使用Future编写上层的代码感兴趣,而不是Future类型如何工作的细节,就可以跳到async/await那章了。不过这章中讨论的话题对于理解async/await的代码如何工作、其运行时和性能属性以及如何创建新的异步原语都很有帮助。如果你确定要跳过这一节,建议你在此留下书签,以便将来再看。
现在来说一说Futuretrait的事情吧。
Future Trait
Futuretrait是Rust异步编程的核心。一个Future就是一个能够产生值的异步计算过程(即便值可以为空,如())。下面是一个简化版的future trait:
#![allow(unused)]
fn main() {
trait SimpleFuture {
    type Output;
    fn poll(&mut self, wake: fn()) -> Poll<Self::Output>;
}

enum Poll<T> {
    Ready(T),
    Pending,
}
}
可通过调用poll函数来提前执行future,以让future尽早完成。在future完成后,会返回Poll::Ready(result)。若future尚未完成,则会返回Poll::Pending并设置Future有进展时要调用的wake()函数。当wake()被调用时,用于驱动Future的executor会再次调用poll以便使Future能够继续进行。
如果没有wake(),executor就无从得知是否有某个future取得进展,而不得不对future进行轮询。通过wake(),executor就能准确得知哪个future准备好被poll了。
考虑这样的情况,我们需要从一个可能有数据,也可能没有数据的socket中进行读取内容。如果有可用的数据,就可以读取它并返回Poll::Ready(data),但若数据尚未准备好,future就会被阻塞,不再有进展。当这种情况发生时,我们就得注册(register)当数据准备好时要调用的wake,它会告知executor,该future已经准备好继续进行了。一个简单的SocketReadfuture如下:
pub struct SocketRead<'a> {
    socket: &'a Socket,
}

impl SimpleFuture for SocketRead<'_> {
    type Output = Vec<u8>;

    fn poll(&mut self, wake: fn()) -> Poll<Self::Output> {
        if self.socket.has_data_to_read() {
            // The socket has data-- read it into a buffer and return it.
            Poll::Ready(self.socket.read_buf())
        } else {
            // The socket does not yet have data.
            //
            // Arrange for `wake` to be called once data is available.
            // When data becomes available, `wake` will be called, and the
            // user of this `Future` will know to call `poll` again and
            // receive data.
            self.socket.set_readable_callback(wake);
            Poll::Pending
        }
    }
}
这种基于Future的模型使得我们不依赖中间的分配(intermediate allocations)即可组织多个异步的行为。运行多个future或chaining futures可通过免分配状态机实现:
/// A SimpleFuture that runs two other futures to completion concurrently.
///
/// Concurrency is achieved via the fact that calls to `poll` each future
/// may be interleaved, allowing each future to advance itself at its own pace.
pub struct Join<FutureA, FutureB> {
    // Each field may contain a future that should be run to completion.
    // If the future has already completed, the field is set to `None`.
    // This prevents us from polling a future after it has completed, which
    // would violate the contract of the `Future` trait.
    a: Option<FutureA>,
    b: Option<FutureB>,
}

impl<FutureA, FutureB> SimpleFuture for Join<FutureA, FutureB>
where
    FutureA: SimpleFuture<Output = ()>,
    FutureB: SimpleFuture<Output = ()>,
{
    type Output = ();
    fn poll(&mut self, wake: fn()) -> Poll<Self::Output> {
        // Attempt to complete future `a`.
        if let Some(a) = &mut self.a {
            if let Poll::Ready(()) = a.poll(wake) {
                self.a.take();
            }
        }

        // Attempt to complete future `b`.
        if let Some(b) = &mut self.b {
            if let Poll::Ready(()) = b.poll(wake) {
                self.b.take();
            }
        }

        if self.a.is_none() && self.b.is_none() {
            // Both futures have completed-- we can return successfully
            Poll::Ready(())
        } else {
            // One or both futures returned `Poll::Pending` and still have
            // work to do. They will call `wake()` when progress can be made.
            Poll::Pending
        }
    }
}
这个例子展示了如何在不分别分配任务的情况下,使多个future共同运行以提高效率。类似地,多个顺序future也可以接连运行,就像这样:
/// A SimpleFuture that runs two futures to completion, one after another.
//
// Note: for the purposes of this simple example, `AndThenFut` assumes both
// the first and second futures are available at creation-time. The real
// `AndThen` combinator allows creating the second future based on the output
// of the first future, like `get_breakfast.and_then(|food| eat(food))`.
pub struct AndThenFut<FutureA, FutureB> {
    first: Option<FutureA>,
    second: FutureB,
}

impl<FutureA, FutureB> SimpleFuture for AndThenFut<FutureA, FutureB>
where
    FutureA: SimpleFuture<Output = ()>,
    FutureB: SimpleFuture<Output = ()>,
{
    type Output = ();
    fn poll(&mut self, wake: fn()) -> Poll<Self::Output> {
        if let Some(first) = &mut self.first {
            match first.poll(wake) {
                // We've completed the first future-- remove it and start on
                // the second!
                Poll::Ready(()) => self.first.take(),
                // We couldn't yet complete the first future.
                Poll::Pending => return Poll::Pending,
            };
        }
        // Now that the first future is done, attempt to complete the second.
        self.second.poll(wake)
    }
}
这些例子展示了Futuretrait是如何用于表达异步控制流,而不需借助多个分配对象和多级嵌套回调。解决了基础的控制流问题,现在来说说和实际的Futuretrait的不同之处吧。
trait Future {
    type Output;
    fn poll(
        // Note the change from `&mut self` to `Pin<&mut Self>`:
        self: Pin<&mut Self>,
        // and the change from `wake: fn()` to `cx: &mut Context<'_>`:
        cx: &mut Context<'_>,
    ) -> Poll<Self::Output>;
}
第一处变动是self的类型不再是&mut Self,而是变成了Pin<&mut Self>。我们会在 之后的章节中讨论固定(pinning)的内容,现在只要知道,它能让我们创建不能变动内容(immovable)的future就行了。这种对象能够存储其各字段的指针,比如struct MyFut { a: i32, ptr_to_a: *const i32 }。固定在async/.await的实现中非常有用。
其次,wake: fn()变成了&mut Context<'_>。在SimpleFuture中,我们通过调用一个函数指针(fn())来告知future的executor,这个future需要被轮询。但是因为fn()只是一个函数指针,它不能储存在Future中被称为wake的数据。
在现实中,像web服务器这样的复杂应用可能会有上千个不同连接,而这些连接的唤醒状况也需要分别管理。Context类型通过提供一个Waker类型值来解决这个问题,这个值能够用于唤醒一个具体的任务(task)。
通过Waker唤醒Task
future在第一次被poll时尚未完成相当常见。此时,future需要确保它在有新进展时能够再次被轮询到,可通过Waker类型来实现。
每次一个future被轮询时,其实是作为一个"task"的一部分来进行的。task是被提交给executor的各个上层future。
Waker提供了一个wake()方法,能够用于告知executor其关联的task需被唤醒。当wake()被调用时,executor就知道与Waker关联的task已有进展,而future则会再次被轮询。
Waker也实现了clone(),因此它可被复制再储存。
来试试通过Waker实现一个简单的定时器吧。
应用:创建定时器
由于只是作为例子,我们要做的就是在定时器创建时开辟一条新的线程,使其休眠所需的时间,然后在时间窗口结束时向计时器发出信号。
这是开始时要添加的import:
#![allow(unused)]
fn main() {
use {
    std::{
        future::Future,
        pin::Pin,
        sync::{Arc, Mutex},
        task::{Context, Poll, Waker},
        thread,
        time::Duration,
    },
};
}
首先要定义future类型。future需要一个方法来告知线程:定时器时间已到,本future需要被完成。于是用一个共享的Arc<Mutex<..>>值来使线程和future进行交流。
pub struct TimerFuture {
    shared_state: Arc<Mutex<SharedState>>,
}

/// Shared state between the future and the waiting thread
struct SharedState {
    /// Whether or not the sleep time has elapsed
    completed: bool,

    /// The waker for the task that `TimerFuture` is running on.
    /// The thread can use this after setting `completed = true` to tell
    /// `TimerFuture`'s task to wake up, see that `completed = true`, and
    /// move forward.
    waker: Option<Waker>,
}
现在来编写Future的具体实现吧!
impl Future for TimerFuture {
    type Output = ();
    fn poll(self: Pin<&mut Self>, cx: &mut Context<'_>) -> Poll<Self::Output> {
        // Look at the shared state to see if the timer has already completed.
        let mut shared_state = self.shared_state.lock().unwrap();
        if shared_state.completed {
            Poll::Ready(())
        } else {
            // Set waker so that the thread can wake up the current task
            // when the timer has completed, ensuring that the future is polled
            // again and sees that `completed = true`.
            //
            // It's tempting to do this once rather than repeatedly cloning
            // the waker each time. However, the `TimerFuture` can move between
            // tasks on the executor, which could cause a stale waker pointing
            // to the wrong task, preventing `TimerFuture` from waking up
            // correctly.
            //
            // N.B. it's possible to check for this using the `Waker::will_wake`
            // function, but we omit that here to keep things simple.
            shared_state.waker = Some(cx.waker().clone());
            Poll::Pending
        }
    }
}
是不是很简单?当线程设置shared_state.completed = true时,就完成了!否则,我们就从当前的task把Waker进行clone,并传递至shared_state.waker,这样线程就能唤醒task了。
重要的是,每次future被轮询都要对Waker进行更新,因为future可能已经转移至另一个有不同Waker的task中了。这可能发生在future在被轮询后,在不同task间传递的过程中。
最后是用于构造计时器和启动线程的API:
impl TimerFuture {
    /// Create a new `TimerFuture` which will complete after the provided
    /// timeout.
    pub fn new(duration: Duration) -> Self {
        let shared_state = Arc::new(Mutex::new(SharedState {
            completed: false,
            waker: None,
        }));

        // Spawn the new thread
        let thread_shared_state = shared_state.clone();
        thread::spawn(move || {
            thread::sleep(duration);
            let mut shared_state = thread_shared_state.lock().unwrap();
            // Signal that the timer has completed and wake up the last
            // task on which the future was polled, if one exists.
            shared_state.completed = true;
            if let Some(waker) = shared_state.waker.take() {
                waker.wake()
            }
        });

        TimerFuture { shared_state }
    }
}
这就是创建一个简单的计时器future的全过程了。现在,只差一个用于运行future的executor了。
应用:创建Executor
Rust中的Future是惰性(lazy)的:除非受到主动驱动而被完成,否则不会做任何事。一种驱动方式是在async函数中使用.await,但是这样只是继续向上层抛出了问题:最终是由谁来运行最顶层的async函数返回的future呢?答案就是,我们需要一个Future的executor。
Future的executor会获取一系列的上层Future并将它们运行至完成,是通过在Future有进展时,调用poll的方式来进行的。一般来说,在一个future开始后,executor就会连续对其进行poll。当Future通过调用wake()来表明,它们已经准备好继续进行 时,就会被放回一个队列中,并再次调用poll,如此重复进行直到Future完成。
在这节中,我们要编写一个简单的,负责并发运行大量上层future直到它们完成的executor。
此例子中,我们要用到futurescrate中的ArcWaketrait,这个trait能提供一个更简便的方法来构造一个Waker。
[package]
name = "xyz"
version = "0.1.0"
authors = ["XYZ Author"]
edition = "2018"

[dependencies]
futures = "0.3"
接下来,在src/main.rs中添加如下import:
use {
    futures::{
        future::{FutureExt, BoxFuture},
        task::{ArcWake, waker_ref},
    },
    std::{
        future::Future,
        sync::{Arc, Mutex},
        sync::mpsc::{sync_channel, SyncSender, Receiver},
        task::{Context, Poll},
        time::Duration,
    },
    // The timer we wrote in the previous section:
    timer_future::TimerFuture,
};
我们的executor会通过使task在通道(channel)中运行来工作。executor会从通道中取出事件(event)并运行之。当一个task准备好继续工作时(即被唤醒),就可以通过将自身放回通道的方式来进行调度,使自身再次被轮询(poll)。
在这种设计中,executor只需要保存task通道的接收端。用户会获得发送端,这样他们就能创建新的future了。至于task,就是能够重新调度自身的future。因此我们将其以一个搭配了sender的future的形式存储,以使task能够通过sender来重新使自身进入(管道的)队列。
/// Task executor that receives tasks off of a channel and runs them.
struct Executor {
    ready_queue: Receiver<Arc<Task>>,
}

/// `Spawner` spawns new futures onto the task channel.
#[derive(Clone)]
struct Spawner {
    task_sender: SyncSender<Arc<Task>>,
}

/// A future that can reschedule itself to be polled by an `Executor`.
struct Task {
    /// In-progress future that should be pushed to completion.
    ///
    /// The `Mutex` is not necessary for correctness, since we only have
    /// one thread executing tasks at once. However, Rust isn't smart
    /// enough to know that `future` is only mutated from one thread,
    /// so we need use the `Mutex` to prove thread-safety. A production
    /// executor would not need this, and could use `UnsafeCell` instead.
    future: Mutex<Option<BoxFuture<'static, ()>>>,

    /// Handle to place the task itself back onto the task queue.
    task_sender: SyncSender<Arc<Task>>,
}

fn new_executor_and_spawner() -> (Executor, Spawner) {
    // Maximum number of tasks to allow queueing in the channel at once.
    // This is just to make `sync_channel` happy, and wouldn't be present in
    // a real executor.
    const MAX_QUEUED_TASKS: usize = 10_000;
    let (task_sender, ready_queue) = sync_channel(MAX_QUEUED_TASKS);
    (Executor { ready_queue }, Spawner { task_sender })
}
还得在(future的)生成器(spawner)中添加一个能让其创建新future的方法。这个方法会接受一个future类型的参数,把它装箱(box it),并创建一个包含装箱结果的Arc<Task>,这样future就可以进入executor的(管道的)队列了。
impl Spawner {
    fn spawn(&self, future: impl Future<Output = ()> + 'static + Send) {
        let future = future.boxed();
        let task = Arc::new(Task {
            future: Mutex::new(Some(future)),
            task_sender: self.task_sender.clone(),
        });
        self.task_sender.send(task).expect("too many tasks queued");
    }
}
为了对future进行轮询,还需要创建一个Waker。如同在task唤醒那一节中所讨论的,Waker负责在wake被调用时,再次调度task使之被轮询。Waker会告知executor哪一个task已经就绪,并允许它们再次轮询已经准备好继续运行的那些future。最简单的创建Waker的方法就是实现ArcWaketrait再使用waker_ref或.into_waker()函数来将Arc<impl ArcWake>转换为Waker。下面为我们的task实现了ArcWake,使之能够转换为Waker和被唤醒:
impl ArcWake for Task {
    fn wake_by_ref(arc_self: &Arc<Self>) {
        // Implement `wake` by sending this task back onto the task channel
        // so that it will be polled again by the executor.
        let cloned = arc_self.clone();
        arc_self.task_sender.send(cloned).expect("too many tasks queued");
    }
}
当从Arc<Task>创建一个Waker时,调用wake()会将一份Arc的拷贝送入task的通道。我们的executor只需要取出它并对其进行轮询。实现如下:
impl Executor {
    fn run(&self) {
        while let Ok(task) = self.ready_queue.recv() {
            // Take the future, and if it has not yet completed (is still Some),
            // poll it in an attempt to complete it.
            let mut future_slot = task.future.lock().unwrap();
            if let Some(mut future) = future_slot.take() {
                // Create a `LocalWaker` from the task itself
                let waker = waker_ref(&task);
                let context = &mut Context::from_waker(&*waker);
                // `BoxFuture<T>` is a type alias for
                // `Pin<Box<dyn Future<Output = T> + Send + 'static>>`.
                // We can get a `Pin<&mut dyn Future + Send + 'static>`
                // from it by calling the `Pin::as_mut` method.
                if let Poll::Pending = future.as_mut().poll(context) {
                    // We're not done processing the future, so put it
                    // back in its task to be run again in the future.
                    *future_slot = Some(future);
                }
            }
        }
    }
}
恭喜!现在我们就有了一个可工作的future的executor。我们甚至可以用它来运行async/.await的代码和自定义的future,比如我们之前编写的TimerFuture:
fn main() {
    let (executor, spawner) = new_executor_and_spawner();

    // Spawn a task to print before and after waiting on a timer.
    spawner.spawn(async {
        println!("howdy!");
        // Wait for our timer future to complete after two seconds.
        TimerFuture::new(Duration::new(2, 0)).await;
        println!("done!");
    });

    // Drop the spawner so that our executor knows it is finished and won't
    // receive more incoming tasks to run.
    drop(spawner);

    // Run the executor until the task queue is empty.
    // This will print "howdy!", pause, and then print "done!".
    executor.run();
}
Executor和系统IO
在之前的Futuretrait一节中,我们讨论了这个从socket异步读取的future例子:
pub struct SocketRead<'a> {
    socket: &'a Socket,
}

impl SimpleFuture for SocketRead<'_> {
    type Output = Vec<u8>;

    fn poll(&mut self, wake: fn()) -> Poll<Self::Output> {
        if self.socket.has_data_to_read() {
            // The socket has data-- read it into a buffer and return it.
            Poll::Ready(self.socket.read_buf())
        } else {
            // The socket does not yet have data.
            //
            // Arrange for `wake` to be called once data is available.
            // When data becomes available, `wake` will be called, and the
            // user of this `Future` will know to call `poll` again and
            // receive data.
            self.socket.set_readable_callback(wake);
            Poll::Pending
        }
    }
}
这个future会从socket中读取可用数据,如果没有可用数据,就让出到executor,并请求在socket可读时再被唤醒。但是通过这个例子还是没有说清楚Socket类型是如何实现的,特别是set_readable_callback这个函数的工作方式。现在的问题是,如何令wake()在socket可用时立即被调用?一个选项是通过一条线程不停检查socket是否可读,并在合适的时候调用wake(),不过这么干效率太低了,因为每一个被阻塞的IO future都得有一条单独的线程。
实际上,这个问题是通过内置的IO感知系统阻塞原语(IO-aware system blocking primitive)来解决的,比如Linux的epoll,FreeBSD/Mac OS/IOCP on Windows的kqueue以及Fuchsia的port(这些都在Rust的跨平台cratemio里得以暴露)。这些原语都允许一个线程在多个异步IO事件中阻塞,当其中一个事件完成了就返回。API看上去是这样的:
struct IoBlocker {
    /* ... */
}

struct Event {
    // 一个用于识别和监听特定事件的ID
    id: usize,

    // 一个需等待或已完成signal的集合
    signals: Signals,
}

impl IoBlocker {
    /// 创建一系列要阻塞的异步IO事件
    fn new() -> Self { /* ... */ }

    /// 表示对特定IO事件的关注
    fn add_io_event_interest(
        &self,

        /// 事件发生时依附的对象
        io_object: &IoObject,
		/// 为驱动事件,需要在 `io_object`中设置一系列signal
		/// 并与给出的ID搭配工作
        event: Event,
    ) { /* ... */ }

    /// 阻塞并等待事件发生
    fn block(&self) -> Event { /* ... */ }
}

let mut io_blocker = IoBlocker::new();
io_blocker.add_io_event_interest(
    &socket_1,
    Event { id: 1, signals: READABLE },
);
io_blocker.add_io_event_interest(
    &socket_2,
    Event { id: 2, signals: READABLE | WRITABLE },
);
let event = io_blocker.block();

// 在某socket可用时输出"Socket 1 is now READABLE"的字样
println!("Socket {:?} is now {:?}", event.id, event.signals);
Future的executor能够利用这些原语来提供异步IO对象,比如能够为socket配置当特定IO事件发生时,要运行的回调函数。在上面SocketRead的例子中,Socket::set_readable_callback的伪代码如下:
impl Socket {
    fn set_readable_callback(&self, waker: Waker) {
    	// `local_executor`是一个对本地executor的引用,能用于socket的创建
    	// 但在实际应用中,为了方便起见,在很多executor实现中
    	// 都会将其传递至线程的本地存储
        let local_executor = self.local_executor;

        // 为IO对象设置唯一ID
        let id = self.id;

		// 在executor的map中存储本地waker
		// 以使其能在IO事件到来时被调用
        local_executor.event_map.insert(id, waker);
        local_executor.add_io_event_interest(
            &self.socket_file_descriptor,
            Event { id, signals: READABLE },
        );
    }
}
现在就有一个能和Waker收发IO事件的executor线程了,能唤醒响应task,让executor能在返回处理其他IO事件(继续循环)前,驱动更多的task完成。
async/.await
在 第一章中我们简单领略了下async/await并用它们建立了一个简单的服务器。这一章会更深入地讨论async/.await的细节,解释它们如何工作,而async代码和传统的Rust程序又有怎样的不同。
async/.await是使让出当前线程的控制权而非阻塞成为可能的语法,让程序可以在等待某个行为完成的同时允许其他代码运行。
有两个使用async的主要方法:async fn和async块(block)。它们都会返回一个实现了Futuretrait的值:
// `foo()` returns a type that implements `Future<Output = u8>`.
// `foo().await` will result in a value of type `u8`.
async fn foo() -> u8 { 5 }

fn bar() -> impl Future<Output = u8> {
    // This `async` block results in a type that implements
    // `Future<Output = u8>`.
    async {
        let x: u8 = foo().await;
        x + 5
    }
}
正如我们在第一章中看到的,async的主体和其他future都是惰性的:直到运行前都不会做任何事。运行一个Future最简单的方法就是.await它。当对Future调用.await时,会试图将Future运行到完成状态。如果Future阻塞了,就让出当前线程的控制权。而可以继续执行时,Future就会被executor取出并回复运行,让.await得以解析(resolve)。
async 生命周期
与普通函数不同,获取引用或其他非'static参数的async fn会返回一个受参数声明周期约束的Future。
// This function:
async fn foo(x: &u8) -> u8 { *x }

// Is equivalent to this function:
fn foo_expanded<'a>(x: &'a u8) -> impl Future<Output = u8> + 'a {
    async move { *x }
}
这意味着async fn返回的future必须 在其非'static参数还有效时 被.await。一般情况下,在调用函数后立即.await其返回的future(比如foo(&x).await)没有问题。但是如果 保存了此future 或 将其发送给了另一个task或线程,就可能出问题。
一个将含引用参数的async fn转化为'staticfuture的常见方案是,将参数及其调用打包在async fn内部的一个async块中:
fn bad() -> impl Future<Output = u8> {
    let x = 5;
    borrow_x(&x) // ERROR: `x` does not live long enough
}

fn good() -> impl Future<Output = u8> {
    async {
        let x = 5;
        borrow_x(&x).await
    }
}
通过将参数移入async块中,我们延长了它的生命周期,使得它匹配了调用call时返回的Future(的生命周期)。
async move
可以对async块和闭包使用move关键字,就跟普通的闭包一样。async move块会获取其引用变量的所有权,使得该变量能够在当前作用域外留存,但是失去了与其他部分代码共享自身的能力:
/// `async` block:
///
/// Multiple different `async` blocks can access the same local variable
/// so long as they're executed within the variable's scope
async fn blocks() {
    let my_string = "foo".to_string();

    let future_one = async {
        // ...
        println!("{}", my_string);
    };

    let future_two = async {
        // ...
        println!("{}", my_string);
    };

    // Run both futures to completion, printing "foo" twice:
    let ((), ()) = futures::join!(future_one, future_two);
}

/// `async move` block:
///
/// Only one `async move` block can access the same captured variable, since
/// captures are moved into the `Future` generated by the `async move` block.
/// However, this allows the `Future` to outlive the original scope of the
/// variable:
fn move_block() -> impl Future<Output = ()> {
    let my_string = "foo".to_string();
    async move {
        // ...
        println!("{}", my_string);
    }
}
多线程Executor的.await
需要注意的是,当使用一个多线程Futureexecutor时,一个Future可能会在线程间转移,因此async代码体重的任何变量同样有在线程间转移的可能,因为.await有可能导致切换至新的线程。
也就是说,使用Rc,&RefCell或者其他没有实现Sendtrait的类型,以及 没有实现Sync的类型 的引用,都是不安全的。
(另:如果不是在调用.await时使用还是可以的。)
类似地,不应该在.await过程中使用一个传统的,非future感知的锁(non-futures-aware lock),因为其可能导致线程池的锁定:一个task除去锁,进行await并向executor让出,让另一个task尝试除去锁,因而造成死锁。为了避免这个现象,请使用futures::lock中的Mutex,而不是std::sync。
Pin
为了对future进行轮询,需要将其用一个特别的,名为Pin<T>的类型来固定(pin)。如果你读了之前Future的执行和Task这一节中对Futuretrait的解释,应该能想起来Pin曾在Future::poll方法定义中的self: Pin<&mut Self>出现。但是这是什么意思?为什么要这么做?
为什么需要Pin
Pin和Unpin标记搭配工作。Pin能够保证实现了!Unpin的对象不会被移动。为了帮助理解,先来回忆下async/.await是如何工作的:
let fut_one = /* ... */;
let fut_two = /* ... */;
async move {
    fut_one.await;
    fut_two.await;
}
从底层来看,其创建了一个实现了Future的匿名类型,并提供了如下的poll方法:
// The `Future` type generated by our `async { ... }` block
struct AsyncFuture {
    fut_one: FutOne,
    fut_two: FutTwo,
    state: State,
}

// List of states our `async` block can be in
enum State {
    AwaitingFutOne,
    AwaitingFutTwo,
    Done,
}

impl Future for AsyncFuture {
    type Output = ();

    fn poll(mut self: Pin<&mut Self>, cx: &mut Context<'_>) -> Poll<()> {
        loop {
            match self.state {
                State::AwaitingFutOne => match self.fut_one.poll(..) {
                    Poll::Ready(()) => self.state = State::AwaitingFutTwo,
                    Poll::Pending => return Poll::Pending,
                }
                State::AwaitingFutTwo => match self.fut_two.poll(..) {
                    Poll::Ready(()) => self.state = State::Done,
                    Poll::Pending => return Poll::Pending,
                }
                State::Done => return Poll::Ready(()),
            }
        }
    }
}
poll首次被调用时,会先对fut_one进行轮询。若fut_one未能完成,则会返回AsyncFuture::poll。每次future调用poll时都会找到上次执行到的地方,此过程接连进行,直到future成功完成。
但要是有一个使用了引用的async块,又会怎样呢?
比如说:
async {
    let mut x = [0; 128];
    let read_into_buf_fut = read_into_buf(&mut x);
    read_into_buf_fut.await;
    println!("{:?}", x);
}
这个会编译成怎样的结构?
struct ReadIntoBuf<'a> {
    buf: &'a mut [u8], // 指向下面的 `x`
}

struct AsyncFuture {
    x: [u8; 128],
    read_into_buf_fut: ReadIntoBuf<'what_lifetime?>,
}
在此处,ReadIntoBuffuture中保存了一个对我们定义的结构体的字段,x,的引用。若AsyncFuture的所有权发生转移,x(在内存中)的位置同样会转移,使得read_into_buf_fut.buf中保存的指针无效。
将future固定(pin)至内存的特定位置可以解决此问题,也因此可以安全地在async块中创建引用了。
Pin详解
来用一个相对简单的例子来解释pin的作用吧。现在问题可以归结为 如何处理 Rust 中的 自引用类型(self-referential type) 中的引用。
例子如下:
use std::pin::Pin;

#[derive(Debug)]
struct Test {
    a: String,
    b: *const String,
}

impl Test {
    fn new(txt: &str) -> Self {
        Test {
            a: String::from(txt),
            b: std::ptr::null(),
        }
    }

    fn init(&mut self) {
        let self_ref: *const String = &self.a;
        self.b = self_ref;
    }

    fn a(&self) -> &str {
        &self.a
    }

    fn b(&self) -> &String {
        unsafe {&*(self.b)}
    }
}
Test提供了用于获取字段a和b引用的方法。b是a的一个引用,由于Rust的借用规则不允许我们定义其生命周期,只好把它作为指针存储。现在就有了一个自引用结构体(self-referential struct)。
如果不转移数据的所有权,例子还是没什么问题的:
fn main() {
    let mut test1 = Test::new("test1");
    test1.init();
    let mut test2 = Test::new("test2");
    test2.init();

    println!("a: {}, b: {}", test1.a(), test1.b());
    println!("a: {}, b: {}", test2.a(), test2.b());

}
use std::pin::Pin;
#[derive(Debug)]
struct Test {
    a: String,
    b: *const String,
}

impl Test {
    fn new(txt: &str) -> Self {
        Test {
            a: String::from(txt),
            b: std::ptr::null(),
        }
    }

    // We need an `init` method to actually set our self-reference
    fn init(&mut self) {
        let self_ref: *const String = &self.a;
        self.b = self_ref;
    }

    fn a(&self) -> &str {
        &self.a
    }

    fn b(&self) -> &String {
        unsafe {&*(self.b)}
    }
}
能够得到预料之中的结果:
a: test1, b: test1
a: test2, b: test2
但要是交换了test1和test2而因此使所有权发生了转移,就不大一样了:
fn main() {
    let mut test1 = Test::new("test1");
    test1.init();
    let mut test2 = Test::new("test2");
    test2.init();

    println!("a: {}, b: {}", test1.a(), test1.b());
    std::mem::swap(&mut test1, &mut test2);
    println!("a: {}, b: {}", test2.a(), test2.b());

}
use std::pin::Pin;
#[derive(Debug)]
struct Test {
    a: String,
    b: *const String,
}

impl Test {
    fn new(txt: &str) -> Self {
        Test {
            a: String::from(txt),
            b: std::ptr::null(),
        }
    }

    fn init(&mut self) {
        let self_ref: *const String = &self.a;
        self.b = self_ref;
    }

    fn a(&self) -> &str {
        &self.a
    }

    fn b(&self) -> &String {
        unsafe {&*(self.b)}
    }
}
从直觉上来说,理应得到debug两次打印了test1的内容:
a: test1, b: test1
a: test1, b: test1
但其实是这样的:
a: test1, b: test1
a: test1, b: test2
test1中指向test2.b的指针还指向原来(test2.b)的位置。结构体不再是自引用的,而是保存了一个指向不同对象的字段的指针。也就是说,test2.b和test2的生命周期也不再绑定在一起了。
还是不信的话,这个肯定能说服你了:
fn main() {
    let mut test1 = Test::new("test1");
    test1.init();
    let mut test2 = Test::new("test2");
    test2.init();

    println!("a: {}, b: {}", test1.a(), test1.b());
    std::mem::swap(&mut test1, &mut test2);
    test1.a = "I've totally changed now!".to_string();
    println!("a: {}, b: {}", test2.a(), test2.b());

}
use std::pin::Pin;
#[derive(Debug)]
struct Test {
    a: String,
    b: *const String,
}

impl Test {
    fn new(txt: &str) -> Self {
        Test {
            a: String::from(txt),
            b: std::ptr::null(),
        }
    }

    fn init(&mut self) {
        let self_ref: *const String = &self.a;
        self.b = self_ref;
    }

    fn a(&self) -> &str {
        &self.a
    }

    fn b(&self) -> &String {
        unsafe {&*(self.b)}
    }
}
下图能够将此过程可视化:
Fig 1: Before and after swap
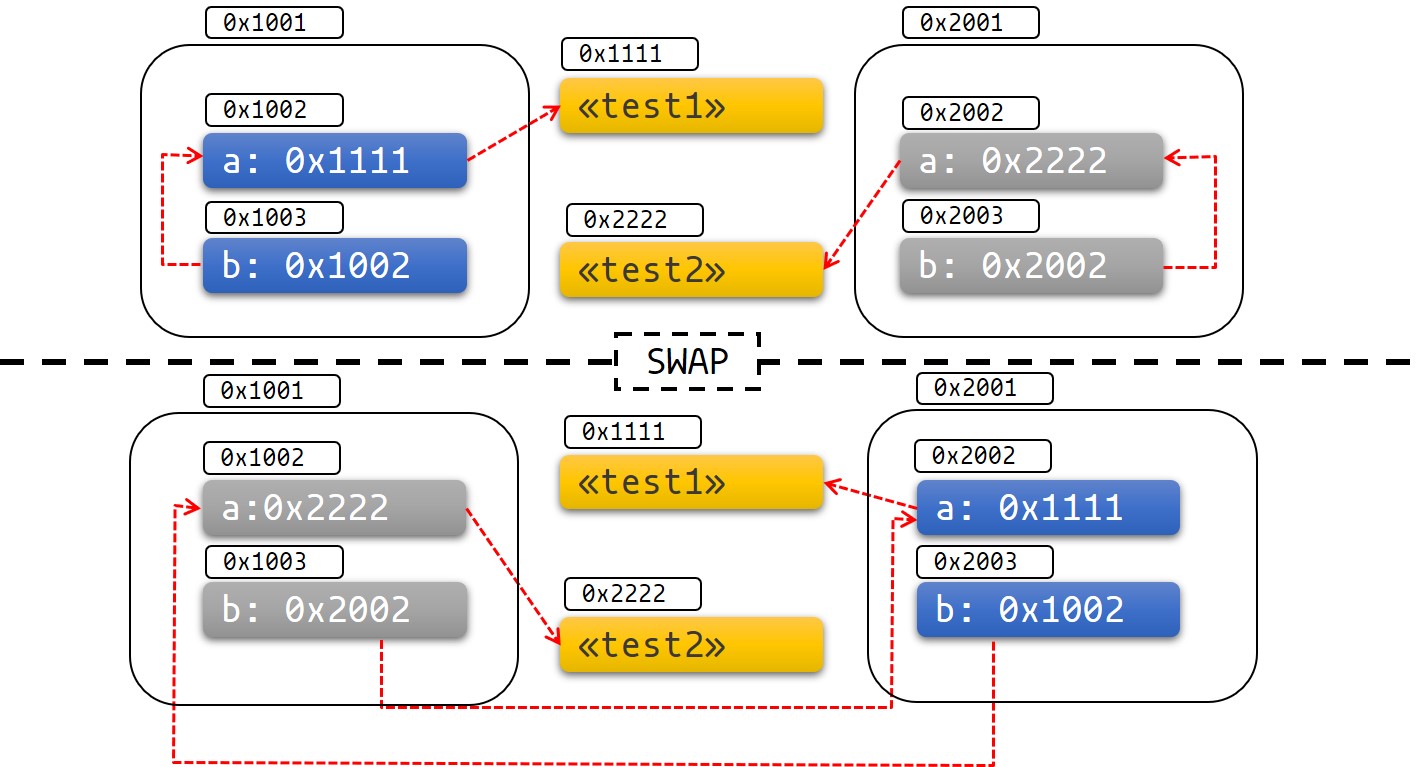
这张图同样地,更明显地展现了此过程中的种种未定义行为或问题。
Pin实践
现在来看看pin和Pin类型是怎么解决问题的。
Pin类型能够对指针类型进行包装,保证其指向的值不会移动。比如,Pin<&mut T>,Pin<&T>,Pin<Box<T>>对于满足T: !Unpin条件的T,均能保证T不被移动。
大部分类型的移动都不存在问题,因为它们实现了名为Unpin的trait。指向Unpin类型的指针 能够自由置于Pin中 或 从Pin中取出。比如说,u8是Unpin类型的,因此Pin<&mut u8>与普通的&mut u8使用方式并无二致。
但是,如果类型经!Unpin标记,就不再能进行移动了。async/await创建的future就是例子之一。
固定(pin)到栈上
再次回到例子中,现在可以用Pin来解决问题了。我们的例子在使用了一个经固定的指针后是这样的:
use std::pin::Pin;
use std::marker::PhantomPinned;

#[derive(Debug)]
struct Test {
    a: String,
    b: *const String,
    _marker: PhantomPinned,
}


impl Test {
    fn new(txt: &str) -> Self {
        Test {
            a: String::from(txt),
            b: std::ptr::null(),
            _marker: PhantomPinned, // This makes our type `!Unpin`
        }
    }
    fn init<'a>(self: Pin<&'a mut Self>) {
        let self_ptr: *const String = &self.a;
        let this = unsafe { self.get_unchecked_mut() };
        this.b = self_ptr;
    }

    fn a<'a>(self: Pin<&'a Self>) -> &'a str {
        &self.get_ref().a
    }

    fn b<'a>(self: Pin<&'a Self>) -> &'a String {
        unsafe { &*(self.b) }
    }
}
若对象实现了!Unpin,则将其固定至栈的行为总是unsafe的,可以用pin_utils 来避免编写unsafe代码。
在下面的代码中,我们将test1和test2两个对象固定至栈:
pub fn main() {
    // 在 `test1` 初始化前对其进行移动是安全的
    let mut test1 = Test::new("test1");
    // 通过覆盖 `test1` 使其不再可达
    let mut test1 = unsafe { Pin::new_unchecked(&mut test1) };
    Test::init(test1.as_mut());

    let mut test2 = Test::new("test2");
    let mut test2 = unsafe { Pin::new_unchecked(&mut test2) };
    Test::init(test2.as_mut());

    println!("a: {}, b: {}", Test::a(test1.as_ref()), Test::b(test1.as_ref()));
    println!("a: {}, b: {}", Test::a(test2.as_ref()), Test::b(test2.as_ref()));
}
use std::pin::Pin;
use std::marker::PhantomPinned;

#[derive(Debug)]
struct Test {
    a: String,
    b: *const String,
    _marker: PhantomPinned,
}


impl Test {
    fn new(txt: &str) -> Self {
        Test {
            a: String::from(txt),
            b: std::ptr::null(),
            // This makes our type `!Unpin`
            _marker: PhantomPinned,
        }
    }
    fn init<'a>(self: Pin<&'a mut Self>) {
        let self_ptr: *const String = &self.a;
        let this = unsafe { self.get_unchecked_mut() };
        this.b = self_ptr;
    }

    fn a<'a>(self: Pin<&'a Self>) -> &'a str {
        &self.get_ref().a
    }

    fn b<'a>(self: Pin<&'a Self>) -> &'a String {
        unsafe { &*(self.b) }
    }
}
现在如果再试图移动数据,就会得到一个编译错误:
pub fn main() {
    let mut test1 = Test::new("test1");
    let mut test1 = unsafe { Pin::new_unchecked(&mut test1) };
    Test::init(test1.as_mut());

    let mut test2 = Test::new("test2");
    let mut test2 = unsafe { Pin::new_unchecked(&mut test2) };
    Test::init(test2.as_mut());

    println!("a: {}, b: {}", Test::a(test1.as_ref()), Test::b(test1.as_ref()));
    std::mem::swap(test1.get_mut(), test2.get_mut());
    println!("a: {}, b: {}", Test::a(test2.as_ref()), Test::b(test2.as_ref()));
}
use std::pin::Pin;
use std::marker::PhantomPinned;

#[derive(Debug)]
struct Test {
    a: String,
    b: *const String,
    _marker: PhantomPinned,
}


impl Test {
    fn new(txt: &str) -> Self {
        Test {
            a: String::from(txt),
            b: std::ptr::null(),
            _marker: PhantomPinned, // This makes our type `!Unpin`
        }
    }
    fn init<'a>(self: Pin<&'a mut Self>) {
        let self_ptr: *const String = &self.a;
        let this = unsafe { self.get_unchecked_mut() };
        this.b = self_ptr;
    }

    fn a<'a>(self: Pin<&'a Self>) -> &'a str {
        &self.get_ref().a
    }

    fn b<'a>(self: Pin<&'a Self>) -> &'a String {
        unsafe { &*(self.b) }
    }
}
类型系统会阻止我们移动此数据。
需要注意的是,栈固定(stack pinning)依赖于我们编写
unsafe代码时做出的保证。尽管我们知道&'a mut T指向的目标被以生命周期'a进行固定,却不能确定&'a mut T的数据在'a结束后是否被移动。如果被移动了,就违背了Pin的约定。有一个很容易犯的错误,就是忘记覆盖原变量,而因此可以在释放
Pin后移动a mut T的数据,就像下面这样(违背了Pin约定):fn main() { let mut test1 = Test::new("test1"); let mut test1_pin = unsafe { Pin::new_unchecked(&mut test1) }; Test::init(test1_pin.as_mut()); drop(test1_pin); println!(r#"test1.b points to "test1": {:?}..."#, test1.b); let mut test2 = Test::new("test2"); mem::swap(&mut test1, &mut test2); println!("... and now it points nowhere: {:?}", test1.b); } use std::pin::Pin; use std::marker::PhantomPinned; use std::mem; #[derive(Debug)] struct Test { a: String, b: *const String, _marker: PhantomPinned, } impl Test { fn new(txt: &str) -> Self { Test { a: String::from(txt), b: std::ptr::null(), // This makes our type `!Unpin` _marker: PhantomPinned, } } fn init<'a>(self: Pin<&'a mut Self>) { let self_ptr: *const String = &self.a; let this = unsafe { self.get_unchecked_mut() }; this.b = self_ptr; } fn a<'a>(self: Pin<&'a Self>) -> &'a str { &self.get_ref().a } fn b<'a>(self: Pin<&'a Self>) -> &'a String { unsafe { &*(self.b) } } }
固定(pin)到堆上
将一个!Unpin类型固定至堆上会为该数据赋予一个稳定的地址,也就是说,一旦数据被固定就不再能移动了。与固定到栈相比,固定到堆会使目标在整个生命周期中都被固定住。
use std::pin::Pin;
use std::marker::PhantomPinned;

#[derive(Debug)]
struct Test {
    a: String,
    b: *const String,
    _marker: PhantomPinned,
}

impl Test {
    fn new(txt: &str) -> Pin<Box<Self>> {
        let t = Test {
            a: String::from(txt),
            b: std::ptr::null(),
            _marker: PhantomPinned,
        };
        let mut boxed = Box::pin(t);
        let self_ptr: *const String = &boxed.as_ref().a;
        unsafe { boxed.as_mut().get_unchecked_mut().b = self_ptr };

        boxed
    }

    fn a<'a>(self: Pin<&'a Self>) -> &'a str {
        &self.get_ref().a
    }

    fn b<'a>(self: Pin<&'a Self>) -> &'a String {
        unsafe { &*(self.b) }
    }
}

pub fn main() {
    let mut test1 = Test::new("test1");
    let mut test2 = Test::new("test2");

    println!("a: {}, b: {}",test1.as_ref().a(), test1.as_ref().b());
    println!("a: {}, b: {}",test2.as_ref().a(), test2.as_ref().b());
}
一些函数需要其future为Unpin。为了在这些函数中使用Future或Stream这种非Unpin的类型,就必须先使用Box::pin(能创建一个Pin<Box<T>>)或pin_utils::pin_mut!宏(能创建一个Pin<&mut T>)来固定值。Pin<Box<Fut>>和Pin<&mut Fut>都能作为future使用,且都实现了Unpin。
举个例子:
use pin_utils::pin_mut; // `pin_utils` crate可从crates.io获得

// 一个接受 `Future` 参数并实现了 Unpin 的函数
fn execute_unpin_future(x: impl Future<Output = ()> + Unpin) { /* ... */ }

let fut = async { /* ... */ };
execute_unpin_future(fut); // Error: `fut` does not implement `Unpin` trait

// 通过 `Box` 固定:
let fut = async { /* ... */ };
let fut = Box::pin(fut);
execute_unpin_future(fut); // OK

// 通过 `pin_mut!` 固定:
let fut = async { /* ... */ };
pin_mut!(fut);
execute_unpin_future(fut); // OK
总结
- 如果有
T: Unpin(默认情况下就是这样),那么Pin<'a, T>与&'a mut T>完全等价。换句话说:Unpin意味着在值被固定(pin)时可被移动,因而Pin不会对此类型有任何影响。 - 如果有
T: !Unpin,那么获取&mut T必须在unsafe块中进行。 - 标准库中大多数类型都实现了
Unpin,而对于Rust中可能遇到的大多数类型同样如此。由async/.await生成的Future是个例外。 - 可在Rust的nightly版本中通过feature flag为某个类型添加
!Unpinbound,或者在stable版本中为类型添加std::marker::PhantomPinned - 可将数据固定至堆或栈
- 将
!Unpin对象固定至栈需要在unsafe块中进行 - 将
!Unpin对象固定至堆不需要unsafe,可使用Box::pin来进行。 - 对于被固定的
T: !Unpin类型的数据,必须要维持其不可变性,即维持其内存内容不会被无效化或被修改,从被固定时开始,直到被释放(drop)时。这是Pin约定的重点。
Stream Trait
Streamtrait和Future很相像,但Stream可以在其完成前返回多个值,与标准库中的Iteratortrait类似:
trait Stream {
    /// The type of the value yielded by the stream.
    type Item;

    /// Attempt to resolve the next item in the stream.
    /// Returns `Poll::Pending` if not ready, `Poll::Ready(Some(x))` if a value
    /// is ready, and `Poll::Ready(None)` if the stream has completed.
    fn poll_next(self: Pin<&mut Self>, cx: &mut Context<'_>)
        -> Poll<Option<Self::Item>>;
}
一个常见的Stream例子就是futurescrate中的管道类型Receiver。每次Sender段有值发送时都会产生一个Some(val),当Sender释放,且所有信息已接收完成时则产生None:
async fn send_recv() {
    const BUFFER_SIZE: usize = 10;
    let (mut tx, mut rx) = mpsc::channel::<i32>(BUFFER_SIZE);

    tx.send(1).await.unwrap();
    tx.send(2).await.unwrap();
    drop(tx);

    // `StreamExt::next` is similar to `Iterator::next`, but returns a
    // type that implements `Future<Output = Option<T>>`.
    assert_eq!(Some(1), rx.next().await);
    assert_eq!(Some(2), rx.next().await);
    assert_eq!(None, rx.next().await);
}
迭代与并发
与同步Iterator相似,有不少不同的迭代处理Stream中值的方法。有像map,filter和fold这种组合子风格(combinator-style)的方法,还有它们提供了出错时提早退出的(early-exit-on-error)的近亲try_map,try_filter和try_fold。
不幸的是,不能对Stream使用for循环,但是对于命令式风格(imperative-style)的代码,是可以使用while let和next/try_next这样的函数的:
async fn sum_with_next(mut stream: Pin<&mut dyn Stream<Item = i32>>) -> i32 {
    use futures::stream::StreamExt; // for `next`
    let mut sum = 0;
    while let Some(item) = stream.next().await {
        sum += item;
    }
    sum
}

async fn sum_with_try_next(
    mut stream: Pin<&mut dyn Stream<Item = Result<i32, io::Error>>>,
) -> Result<i32, io::Error> {
    use futures::stream::TryStreamExt; // for `try_next`
    let mut sum = 0;
    while let Some(item) = stream.try_next().await? {
        sum += item;
    }
    Ok(sum)
}
但要是一次只处理一个元素,就失去了并发的机会,毕竟编写异步代码是第一位的。为了并发处理Stream中的多个内容,请使用for_each_concurrent和try_for_each_concurrent:
async fn jump_around(
    mut stream: Pin<&mut dyn Stream<Item = Result<u8, io::Error>>>,
) -> Result<(), io::Error> {
    use futures::stream::TryStreamExt; // for `try_for_each_concurrent`
    const MAX_CONCURRENT_JUMPERS: usize = 100;

    stream.try_for_each_concurrent(MAX_CONCURRENT_JUMPERS, |num| async move {
        jump_n_times(num).await?;
        report_n_jumps(num).await?;
        Ok(())
    }).await?;

    Ok(())
}
单次执行多个Future
到目前为止,我们几乎都是用.await来执行Future的,其会阻塞当前的task,直到某个特定Future完成。但是,在实际的异步应用中常常需要并发执行多个不同的行动。
在这一章中,会涉及一些单次执行多个异步行动的方法:
join!:等待future全部完成select!:等待几个future中的某个完成- Spawning: creates a top-level task which ambiently runs a future to completion
FuturesUnordered:一组能够返回子future结果的future
join!
futures::join宏可以在 并发执行多个future的同时 等待它们完成。
join!
当进行多个异步行动时,很容易就只是简单地、连续对它们使用.await:
async fn get_book_and_music() -> (Book, Music) {
    let book = get_book().await;
    let music = get_music().await;
    (book, music)
}
但是这样会比理论上要慢,因为get_book执行完后才会开始尝试执行get_music。在一些编程语言里,future会环境运行至完成(ambiently run to completion?译注:指有些语言会在调用异步函数时就开始执行future,而非像Rust一样到被await时才执行),因此这两个行动会在async fn调用时就开始运行future,之后只要await它们就好了:
// WRONG -- don't do this
async fn get_book_and_music() -> (Book, Music) {
    let book_future = get_book();
    let music_future = get_music();
    (book_future.await, music_future.await)
}
但是,Rust中的Future在被.await时才开始工作。也就是说上面的两个代码片段都会顺序执行book_future和music_future,而非并发运行。为了使这两个future能正确地并发运行,要使用futures::join!:
use futures::join;

async fn get_book_and_music() -> (Book, Music) {
    let book_fut = get_book();
    let music_fut = get_music();
    join!(book_fut, music_fut)
}
join!的返回值是一个包含了 每个传入的Future的执行结果 的元组。
try_join!
对于返回Result的future,可以考虑用try_join!取代join!。由于join!只在所有子future完成时才算完成,因此即便某个子future返回了Err,仍然会继续处理其他future。
与join!不同的是,try_join!会在任一子future返回Err时立即完成
use futures::try_join;

async fn get_book() -> Result<Book, String> { /* ... */ Ok(Book) }
async fn get_music() -> Result<Music, String> { /* ... */ Ok(Music) }

async fn get_book_and_music() -> Result<(Book, Music), String> {
    let book_fut = get_book();
    let music_fut = get_music();
    try_join!(book_fut, music_fut)
}
需要注意的是,传递给try_join!的future参数返回的错误类型必须相同。请考虑使用futures::future::TryFutureExt中的.map_err(|e| ...)和.err_into()来合并错误类型:
use futures::{
    future::TryFutureExt,
    try_join,
};

async fn get_book() -> Result<Book, ()> { /* ... */ Ok(Book) }
async fn get_music() -> Result<Music, String> { /* ... */ Ok(Music) }

async fn get_book_and_music() -> Result<(Book, Music), String> {
    let book_fut = get_book().map_err(|()| "Unable to get book".to_string());
    let music_fut = get_music();
    try_join!(book_fut, music_fut)
}
select!
futures::select宏让用户可同时运行多个future,并在在任意future完成时做出响应。
#![allow(unused)]
fn main() {
use futures::{
    future::FutureExt, // for `.fuse()`
    pin_mut,
    select,
};

async fn task_one() { /* ... */ }
async fn task_two() { /* ... */ }

async fn race_tasks() {
    let t1 = task_one().fuse();
    let t2 = task_two().fuse();

    pin_mut!(t1, t2);

    select! {
        () = t1 => println!("task one completed first"),
        () = t2 => println!("task two completed first"),
    }
}
}
上面的函数会并发运行t1和t2。只要其中一个完成了,对应的处理程序(corresponding handler)就会调用println!,并在不执行剩余task的情况下直接结束。
select的基本语法是<pattern> = <expression> => <code>,,对每一个要select的future重复即可。
default => ... 和 complete => ...
select同样支持default和complete分支。
default分支会在每个被select的future都还没完成时执行。拥有default分支的select会因此总是立即返回,因为default会在任一future都未就绪时执行。
complete分支可用来处理所有被select的future均完成且不需再运行的情况,经常是在select!中循环时被用到。
#![allow(unused)]
fn main() {
use futures::{future, select};

async fn count() {
    let mut a_fut = future::ready(4);
    let mut b_fut = future::ready(6);
    let mut total = 0;

    loop {
        select! {
            a = a_fut => total += a,
            b = b_fut => total += b,
            complete => break,
            default => unreachable!(), // never runs (futures are ready, then complete)
        };
    }
    assert_eq!(total, 10);
}
}
与Unpin 和 FusedFuture的交互使用
在上面的第一个例子中你可能注意到,我们不得不对这两个async fn返回的future调用.fuse(),并使用pin_mut将其固定(pin)。之所以要这么做,是因为在select中使用的future必须实现Unpin和FusedFuture两个trait。
由于select接受的future参数并非是其值,而是其可变引用,因此需要Unpin。而也正是因为没有获取future的所有权,在调用select后未完成的future仍可以被重用。
类似地,若要让select不在某个future已完成后,再对其进行轮询,该future就需要FusedFuturetrait。通过实现FusedFuture,可以追踪future是否完成,因而可以在循环中使用loop,且只要对尚未完成的future进行轮询就够了。通过上面的例子就能看出,a_fut或b_fut在第二次循环时应已完成。由于future::ready返回的future实现了FusedFuture,就能够告知select不要再次对其进行轮询。
需要注意的是,Stream也具有相应的FusedStreamtrait。实现了FusedStream或经.fuse()封装的Stream会通过.next()/.try_next()组合子产生具有FusedFuturetrait的future。
#![allow(unused)]
fn main() {
use futures::{
    stream::{Stream, StreamExt, FusedStream},
    select,
};

async fn add_two_streams(
    mut s1: impl Stream<Item = u8> + FusedStream + Unpin,
    mut s2: impl Stream<Item = u8> + FusedStream + Unpin,
) -> u8 {
    let mut total = 0;

    loop {
        let item = select! {
            x = s1.next() => x,
            x = s2.next() => x,
            complete => break,
        };
        if let Some(next_num) = item {
            total += next_num;
        }
    }

    total
}
}
使用Fuse和FuturesUnordered在select循环中运行并发Task
有个存在感稍弱但是很好用的函数是Fuse::terminated(),通过它可以构造一个已经终止(terminated)的空future,且之后可在其中填充我们要运行的内容。如果一个task要在select循环中运行,而且在这个循环中才被创建,这个函数就有用了。
还有一个就是.select_next_some()函数。它可以与select共同使用,当Stream中返回的值为Some(_)时才运行该分支,而忽略None值。
#![allow(unused)]
fn main() {
use futures::{
    future::{Fuse, FusedFuture, FutureExt},
    stream::{FusedStream, Stream, StreamExt},
    pin_mut,
    select,
};

async fn get_new_num() -> u8 { /* ... */ 5 }

async fn run_on_new_num(_: u8) { /* ... */ }

async fn run_loop(
    mut interval_timer: impl Stream<Item = ()> + FusedStream + Unpin,
    starting_num: u8,
) {
    let run_on_new_num_fut = run_on_new_num(starting_num).fuse();
    let get_new_num_fut = Fuse::terminated();
    pin_mut!(run_on_new_num_fut, get_new_num_fut);
    loop {
        select! {
            () = interval_timer.select_next_some() => {
                // The timer has elapsed. Start a new `get_new_num_fut`
                // if one was not already running.
                if get_new_num_fut.is_terminated() {
                    get_new_num_fut.set(get_new_num().fuse());
                }
            },
            new_num = get_new_num_fut => {
                // A new number has arrived-- start a new `run_on_new_num_fut`,
                // dropping the old one.
                run_on_new_num_fut.set(run_on_new_num(new_num).fuse());
            },
            // Run the `run_on_new_num_fut`
            () = run_on_new_num_fut => {},
            // panic if everything completed, since the `interval_timer` should
            // keep yielding values indefinitely.
            complete => panic!("`interval_timer` completed unexpectedly"),
        }
    }
}
}
若同一future的多个拷贝需要同时运行,请使用FuturesUnordered类型。下面的例子和上面的差不多,但是会将run_on_new_num_fut的每个拷贝都运行至完成,而非在一份新的拷贝创建时就放弃执行。它会输出run_on_new_num_fut的返回的一个值。
#![allow(unused)]
fn main() {
use futures::{
    future::{Fuse, FusedFuture, FutureExt},
    stream::{FusedStream, FuturesUnordered, Stream, StreamExt},
    pin_mut,
    select,
};

async fn get_new_num() -> u8 { /* ... */ 5 }

async fn run_on_new_num(_: u8) -> u8 { /* ... */ 5 }

// Runs `run_on_new_num` with the latest number
// retrieved from `get_new_num`.
//
// `get_new_num` is re-run every time a timer elapses,
// immediately cancelling the currently running
// `run_on_new_num` and replacing it with the newly
// returned value.
async fn run_loop(
    mut interval_timer: impl Stream<Item = ()> + FusedStream + Unpin,
    starting_num: u8,
) {
    let mut run_on_new_num_futs = FuturesUnordered::new();
    run_on_new_num_futs.push(run_on_new_num(starting_num));
    let get_new_num_fut = Fuse::terminated();
    pin_mut!(get_new_num_fut);
    loop {
        select! {
            () = interval_timer.select_next_some() => {
                // The timer has elapsed. Start a new `get_new_num_fut`
                // if one was not already running.
                if get_new_num_fut.is_terminated() {
                    get_new_num_fut.set(get_new_num().fuse());
                }
            },
            new_num = get_new_num_fut => {
                // A new number has arrived-- start a new `run_on_new_num_fut`.
                run_on_new_num_futs.push(run_on_new_num(new_num));
            },
            // Run the `run_on_new_num_futs` and check if any have completed
            res = run_on_new_num_futs.select_next_some() => {
                println!("run_on_new_num_fut returned {:?}", res);
            },
            // panic if everything completed, since the `interval_timer` should
            // keep yielding values indefinitely.
            complete => panic!("`interval_timer` completed unexpectedly"),
        }
    }
}

}
Workarounds to Know and Love
Rust的async支持尚处于起步阶段,一部分热门特性还在积极开发测试中。本章会讨论一些常见痛点并解释如何绕过它们。
返回类型出错
在一个常见的Rust函数中,返回一个错误的类型会导致如下错误:
error[E0308]: mismatched types
 --> src/main.rs:2:12
  |
1 | fn foo() {
  |           - expected `()` because of default return type
2 |     return "foo"
  |            ^^^^^ expected (), found reference
  |
  = note: expected type `()`
             found type `&'static str`
但是当前的async fn是不知道如何“信任”函数签名中的返回类型的,因而可能引起类型不匹配,甚至是(reversed-sounding)错误。比如说,函数async fn foo() { "foo" }就会导致这个错误:
error[E0271]: type mismatch resolving `<impl std::future::Future as std::future::Future>::Output == ()`
 --> src/lib.rs:1:16
  |
1 | async fn foo() {
  |                ^ expected &str, found ()
  |
  = note: expected type `&str`
             found type `()`
  = note: the return type of a function must have a statically known size
错误信息说该函数应返回一个&str值,但只找到了一个(),跟我们想象中的情况正好相反。这是因为编译器错误地相信了“函数体会返回正确类型”这件事。
一个应对方法就是记住,当错误信息通过"expected SomeType, found OtherType"的信息指出了 函数签名 的问题时,通常表明实际上是 返回的位置 出了问题。
正在通过这个bug报告页来追踪此问题的修复情况。
async 块中的?
就跟在async fn中一样,在async块中使用?的场景也很常见。但是,async块的返回类型并未显式声明出,因而可能导致编译器不能推断出async块的错误类型。
比如说这段代码:
#![allow(unused)]
fn main() {
struct MyError;
async fn foo() -> Result<(), MyError> { Ok(()) }
async fn bar() -> Result<(), MyError> { Ok(()) }
let fut = async {
    foo().await?;
    bar().await?;
    Ok(())
};
}
会导致这个错误:
error[E0282]: type annotations needed
 --> src/main.rs:5:9
  |
4 |     let fut = async {
  |         --- consider giving `fut` a type
5 |         foo().await?;
  |         ^^^^^^^^^^^^ cannot infer type
不幸的是,目前还没有“为fut注明类型”,或者是显式声明async块返回值的方法。应对方法是使用“涡轮鱼(turbofish,指Rust中用来绑定泛型参数的操作符::<>)”操作符来为async块提供成功和失败时的返回类型。
#![allow(unused)]
fn main() {
struct MyError;
async fn foo() -> Result<(), MyError> { Ok(()) }
async fn bar() -> Result<(), MyError> { Ok(()) }
let fut = async {
    foo().await?;
    bar().await?;
    Ok::<(), MyError>(()) // <- note the explicit type annotation here
};
}
Send 估计
有的async fn状态机在线程间传递时是安全的,有的不是。一个async fn的future是否具有Sendtrait是根据 是否有 跨越带.await的语句的 非Send类型来判断的。编译器会尽可能估计这些值可能跨越.await的时点,但是在今天看来,这种分析显得太过保守了。
举个例子,考虑一个简单的非Send类型,比如包含了一个Rc的类型:
#![allow(unused)]
fn main() {
use std::rc::Rc;

#[derive(Default)]
struct NotSend(Rc<()>);
}
NotSend类型的变量在async fn中可以作为临时变量短时间出现,即便async fn返回的最终的Future类型必须是Send:
use std::rc::Rc;
#[derive(Default)]
struct NotSend(Rc<()>);
async fn bar() {}
async fn foo() {
    NotSend::default();
    bar().await;
}

fn require_send(_: impl Send) {}

fn main() {
    require_send(foo());
}
但是,如果改变foo来将NotSend存储在一个变量中,这个例子就不能编译了:
However, if we change foo to store NotSend in a variable, this example no
longer compiles:
use std::rc::Rc;
#[derive(Default)]
struct NotSend(Rc<()>);
async fn bar() {}
async fn foo() {
    let x = NotSend::default();
    bar().await;
}
fn require_send(_: impl Send) {}
fn main() {
   require_send(foo());
}
error[E0277]: `std::rc::Rc<()>` cannot be sent between threads safely
  --> src/main.rs:15:5
   |
15 |     require_send(foo());
   |     ^^^^^^^^^^^^ `std::rc::Rc<()>` cannot be sent between threads safely
   |
   = help: within `impl std::future::Future`, the trait `std::marker::Send` is not implemented for `std::rc::Rc<()>`
   = note: required because it appears within the type `NotSend`
   = note: required because it appears within the type `{NotSend, impl std::future::Future, ()}`
   = note: required because it appears within the type `[static generator@src/main.rs:7:16: 10:2 {NotSend, impl std::future::Future, ()}]`
   = note: required because it appears within the type `std::future::GenFuture<[static generator@src/main.rs:7:16: 10:2 {NotSend, impl std::future::Future, ()}]>`
   = note: required because it appears within the type `impl std::future::Future`
   = note: required because it appears within the type `impl std::future::Future`
note: required by `require_send`
  --> src/main.rs:12:1
   |
12 | fn require_send(_: impl Send) {}
   | ^^^^^^^^^^^^^^^^^^^^^^^^^^^^^

error: aborting due to previous error

For more information about this error, try `rustc --explain E0277`.
这个报错没问题。如果我们将x存储到变量中,直到.await结束后它才应被释放,到那时async fn可能在另一个线程上运行了。既然Rc不是Send,允许其在线程间传递就是不安全的。一个简单的解决方案就是在.await前就把Rc给drop掉,不过这个目前不行。
为了解决这个问题,可以通过一个块作用域来把非Send变量包裹起来,这样编译器就能知道有哪些变量不能越过.await语句了。
use std::rc::Rc;
#[derive(Default)]
struct NotSend(Rc<()>);
async fn bar() {}
async fn foo() {
    {
        let x = NotSend::default();
    }
    bar().await;
}
fn require_send(_: impl Send) {}
fn main() {
   require_send(foo());
}
递归
在内部,async fn会创建一个包含了所有被.await的子Future的状态机类型。由于最终的状态机类型要包含自身,要实现递归的async fn就有些难办了:
#![allow(unused)]
fn main() {
async fn step_one() { /* ... */ }
async fn step_two() { /* ... */ }
struct StepOne;
struct StepTwo;
// 这个函数:
async fn foo() {
    step_one().await;
    step_two().await;
}
// 会产生一个这样的类型:
enum Foo {
    First(StepOne),
    Second(StepTwo),
}

// 因此这个函数:
async fn recursive() {
    recursive().await;
    recursive().await;
}

// 会产生这样一个类型:
enum Recursive {
    First(Recursive),
    Second(Recursive),
}
}
此时还不能工作——我们创建了一个无限大小的类型! 编译器会这样报错:
error[E0733]: recursion in an `async fn` requires boxing
 --> src/lib.rs:1:22
  |
1 | async fn recursive() {
  |                      ^ an `async fn` cannot invoke itself directly
  |
  = note: a recursive `async fn` must be rewritten to return a boxed future.
为了允许这种情况的发生,就要在中间加一层Box。然而编译器的限制意味着,仅仅是将对recursive()的调用包装在Box::pin还不够。我们还得将recursive转化为一个非async函数并返回一个经过.boxed()的async块:
#![allow(unused)]
fn main() {
use futures::future::{BoxFuture, FutureExt};

fn recursive() -> BoxFuture<'static, ()> {
    async move {
        recursive().await;
        recursive().await;
    }.boxed()
}
}
Trait中的async
目前还不能在trait中使用async fn。原因有点复杂,但移除这种限制已在计划之中。
但与此同时,其实可以用crates.io中的async-trait crate来实现。
需要注意的是,使用这些trait方法会导致,每次调用函数时都需要进行堆分配。尽管对于大部分应用来说都不会有什么显著的开销,但是若准备在那种,可能每秒都要调用几百万次的,底层函数的公共API里使用此功能,还请三思。